Poco::Util::Timer 是一个线程安全的可变时长的定时器,相较于Poco::Timer,其更为灵活。设计思想借鉴了 Java 1.3 的 java.util.Timer 类
总览
Poco::Util::Timer 设计中核心数据结构是 Poco::TimedNotificationQueue ,它是一个时间队列,以入队的时间戳为优先级出队列。
Poco::Util::Timer 添加定时任务时,相当于把所有任务作为 Notification 放入时间队列,内部线程不断地从时间队列中,按照设定的延时顺序取出任务并执行,这样就可以达到一个定时执行任务的作用。
这样的设计可以保证定时器极大的自由度,包括可以定时执行多个任务,重复执行某个任务,并且由于 Poco::TimedNotificationQueue 的线程安全,Poco::Util::Timer 也是线程安全的。
浅出
1. 定义定时任务 TimerTask
//定义TimerTask,并使用类A的func函数作为定时器函数。
Poco::Util::TimerTask::Ptr _timerTask = new Poco::Util::TimerTaskAdapter<A>(*this, &A::func);

//定义Timer
Poco::SharedPtr<Poco::Util::Timer> _timer = new Poco::Util::Timer();
2. 使用 schedule 启动定时任务
//用法一:在指定的时刻执行。如果设定为过去的某一时刻,则立即执行任务。
void schedule(TimerTask::Ptr pTask, Poco::Timestamp time);

//用法二:在延迟一定时间后执行。注意,就算系统时间更改,任然会严格按照相对时间延时执行。
void schedule(TimerTask::Ptr pTask, Poco::Clock clock);

//用法三:延迟一定时间后,周期性的间隔interval来执行任务。
void schedule(TimerTask::Ptr pTask, long delay, long interval);

//用法四:延迟到某一时刻,周期性的间隔interval来执行任务。
void schedule(TimerTask::Ptr pTask, Poco::Timestamp time, long interval);

//用法五:延迟一定时间后,按照固定的时间间隔interval执行任务。
void scheduleAtFixedRate(TimerTask::Ptr pTask, long delay, long interval);

//用法六:延迟到某一时刻,按照固定的时间间隔interval执行任务。
void scheduleAtFixedRate(TimerTask::Ptr pTask, Poco::Timestamp time, long interval);
3. 使用 cancel 停止定时任务
//等待定时任务完成后停止
_timer.cancel(true);

//不等待定时任务完成立即停止
_timer.cancel(false);
注意:1.9.0版本之前 ,Poco::Util::Timer 存在一个比较严重的死锁bug!当调用 cancel(false) 之后,立即释放 timer 对象时,会使其不能结束定时器线程,而调用 cancel 的线程会会等待定时器线程结束后返回,造成死锁。
深入
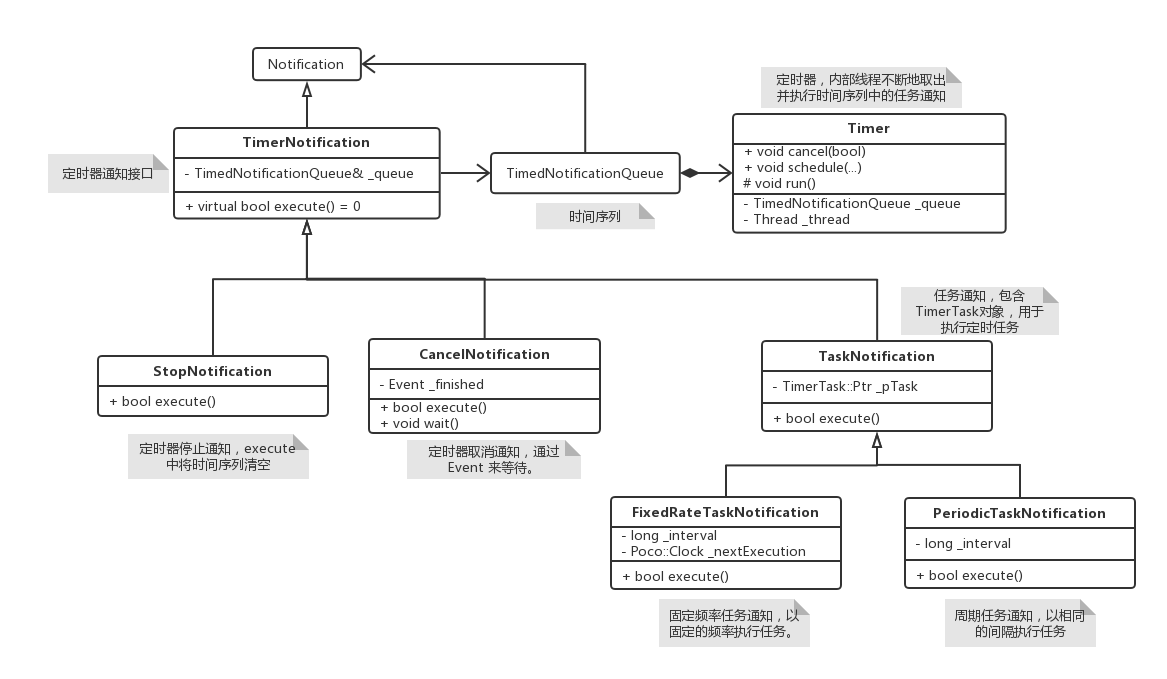
Poco::Util::Timer 类图:
代码解读
1. 时间序列
Timer 设计的核心就是使用时间序列,按照时间戳取出定时任务并执行。由于 TimedNotificationQueue 的线程安全,所以可以 schedule 也是线程安全的。所有定时任务的执行均是在一个线程中,所以如果某个定时任务执行时间过长,可能会造成下个定时任务延期执行。
void Timer::run()
{
	bool cont = true;
	while (cont)    //如果执行完成后返回 true,就继续下一次任务,如果是 false 就退出循环!
	{
		Poco::AutoPtr<TimerNotification> pNf
          = static_cast<TimerNotification*>(_queue.waitDequeueNotification());
		cont = pNf->execute();
	}
}
2. 死锁
Poco 1.9.0 之前的版本存在死锁bug。主要是由于 StopNotification 和 CancelNotification 导致的。流程是调用cancel(false) 后,立即释放 timer。调用 cancel 会将 CancelNotification 入队,析构 timer 会将 StopNotification 入队。
死锁产生的流程:
bool CancelNotification::execute()
{
  queue().clear();      //1. 清空时间序列,将随后的 StopNotification 清空!
  _finished.set();
  return true;          //2. 返回true,timer将继续循环
}

void CancelNotification::wait()
{
  _finished.wait();
}
bool StopNotification::execute()
{
  queue().clear();
  return false;           //3. 由于被之前的 CancelNotification 清空,timer 循环无法退出!
}
Timer::~Timer()
{
	try
	{
		_queue.enqueueNotification(new StopNotification(_queue), Poco::Clock(0));
		_thread.join();    //4. 由于任务线程无法退出,所以这里形成死锁!
	}
	catch (...)
	{
		poco_unexpected();
	}
}
解决方法:
Poco 1.9.0 之后的 CancelNotification 清除队列时不再是粗暴的调用 clear ,而是一个一个的出队列,如果发现 StopNotification 则返回false,结束工作线程,避免死锁。
Poco 1.9.0 之前的版本只能在析构 timer 时调用 cancel(true) ,等待定时任务完成后再退出。